A Simple Next.js File Server
Apr 5, 2025
17 min read

Introduction
The complete project repository is available here.
We will be building a simple file server that functions as a web-based file explorer for a specified directory FILE_STORAGE_ROOT_DIR on your server. The key features include:
- File Browsing: View files and directories under a given path (of course, it should be under
FILE_STORAGE_ROOT_DIR) - File Downloading: Pick and download the files from the server as needed
- API Key Authentication: Simple but effective protection
Why I Built This
I am running several microservices on a remote server that continuously generate data and files. At some point in my life, I need to download these outputs for data analysis or machine learning projects - whether it’s processing logs, training models, or just examining results.
While many file storage and management solutions like Nginx exist, I always prefer crafting my own tools 💪🛠️.
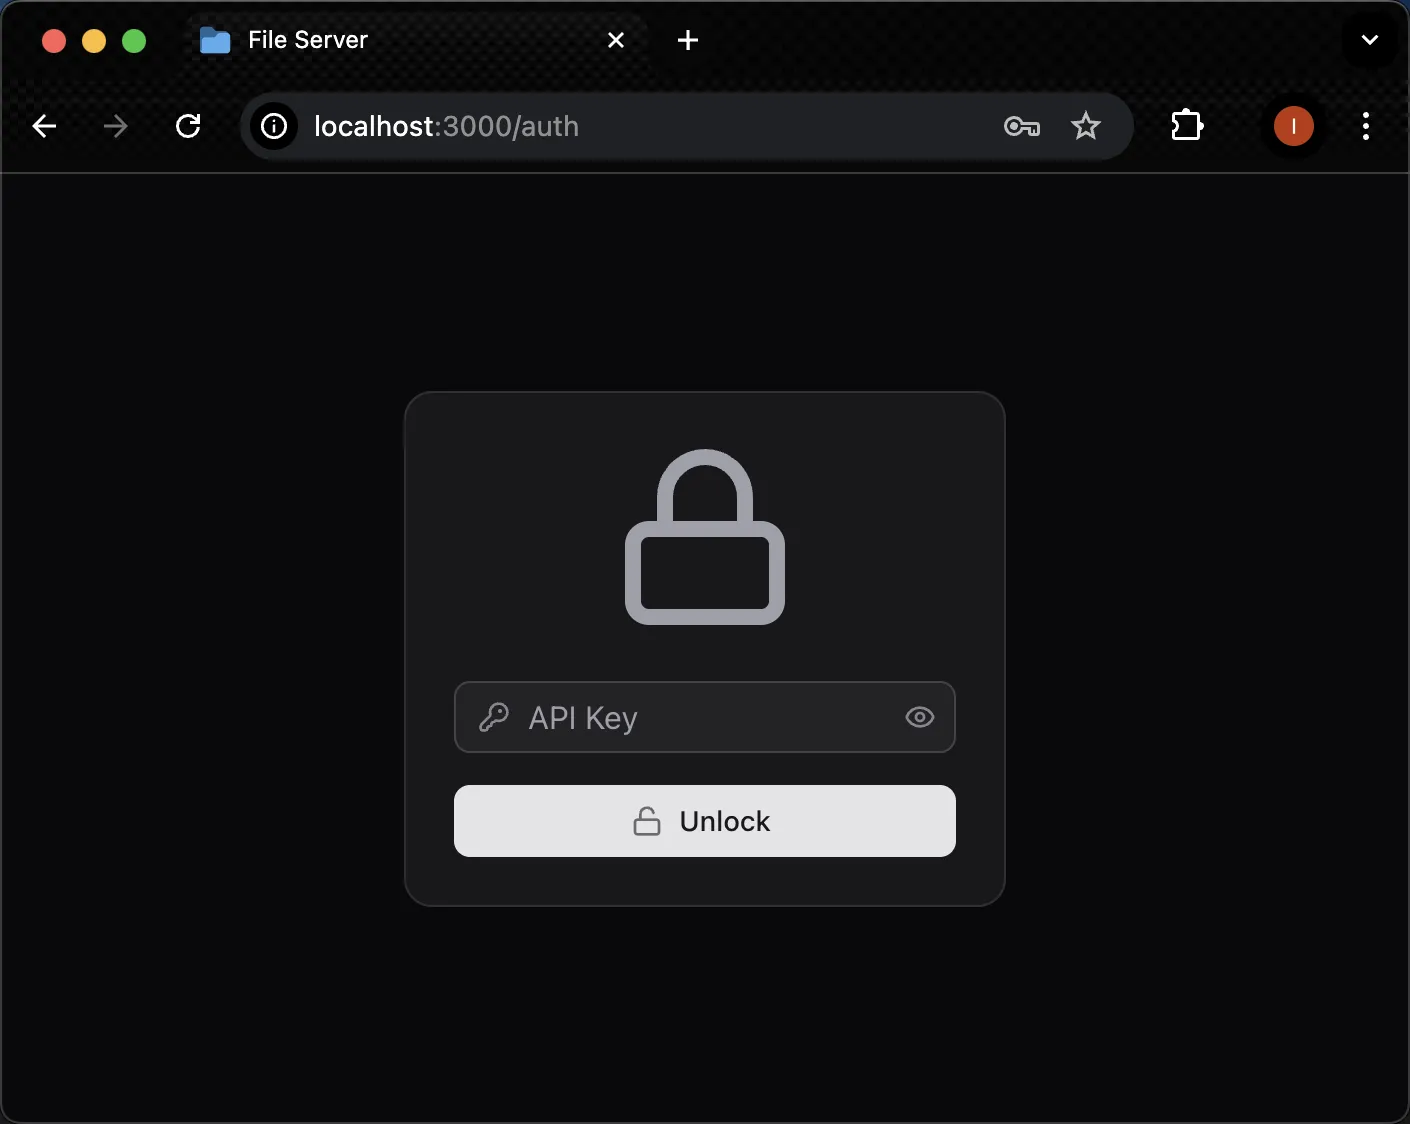
App Screenshots
Auth page:
File storage page:
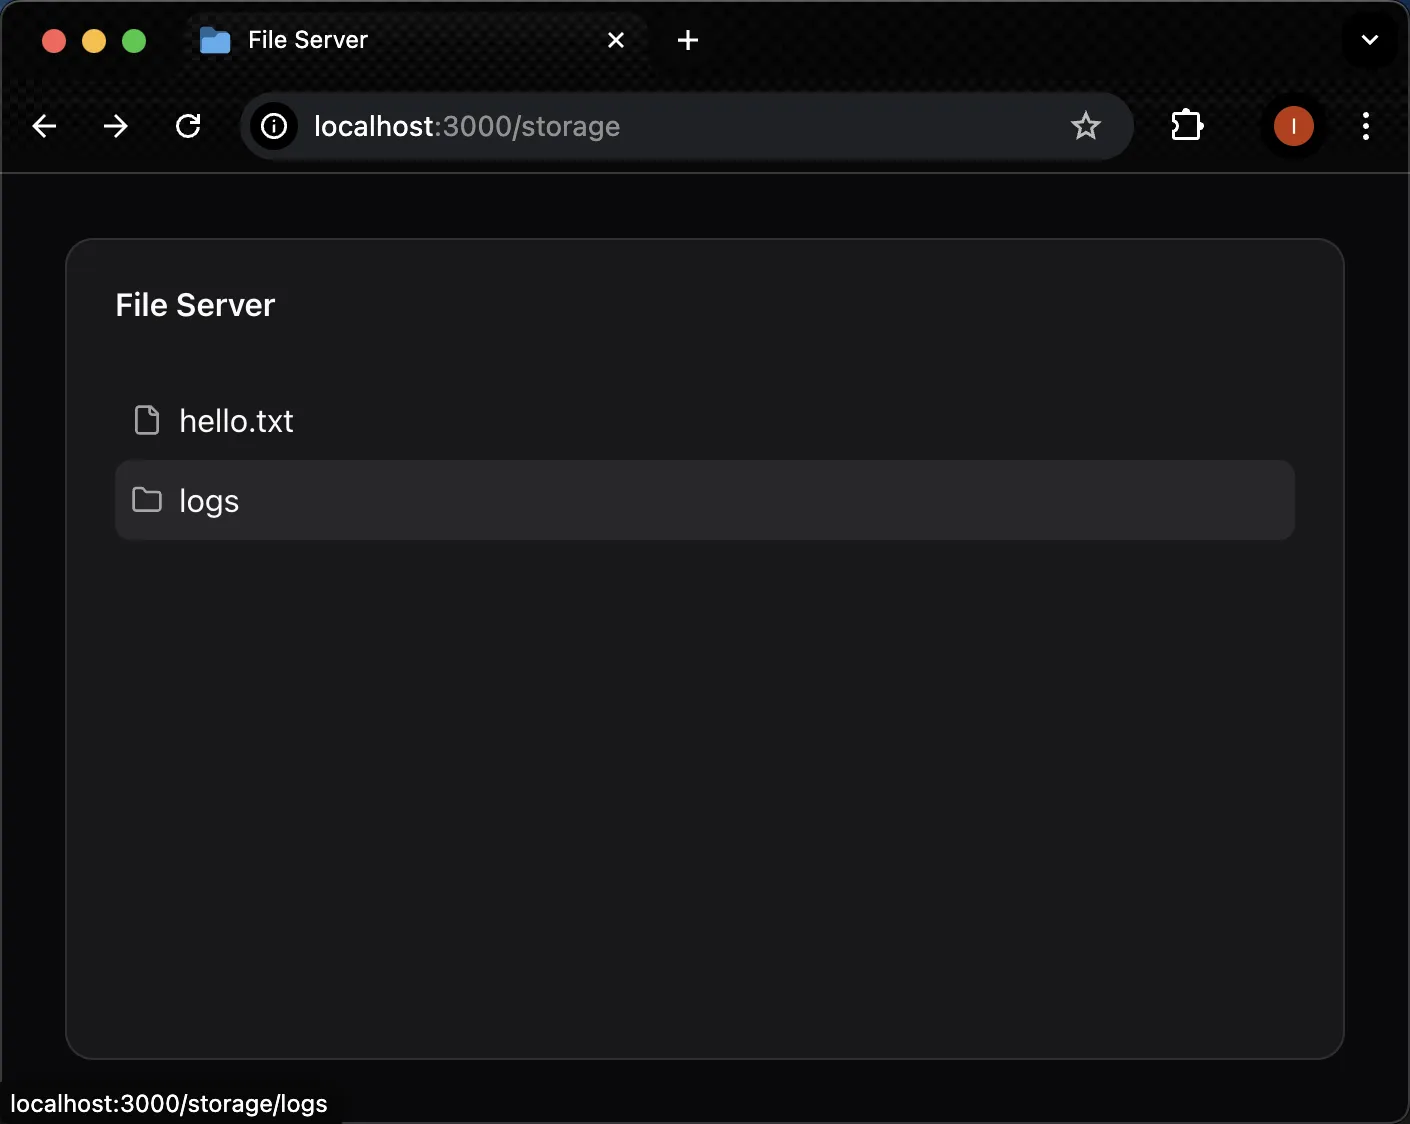
After clicking the logs directory, the page will list all the files and directories under the logs directory:
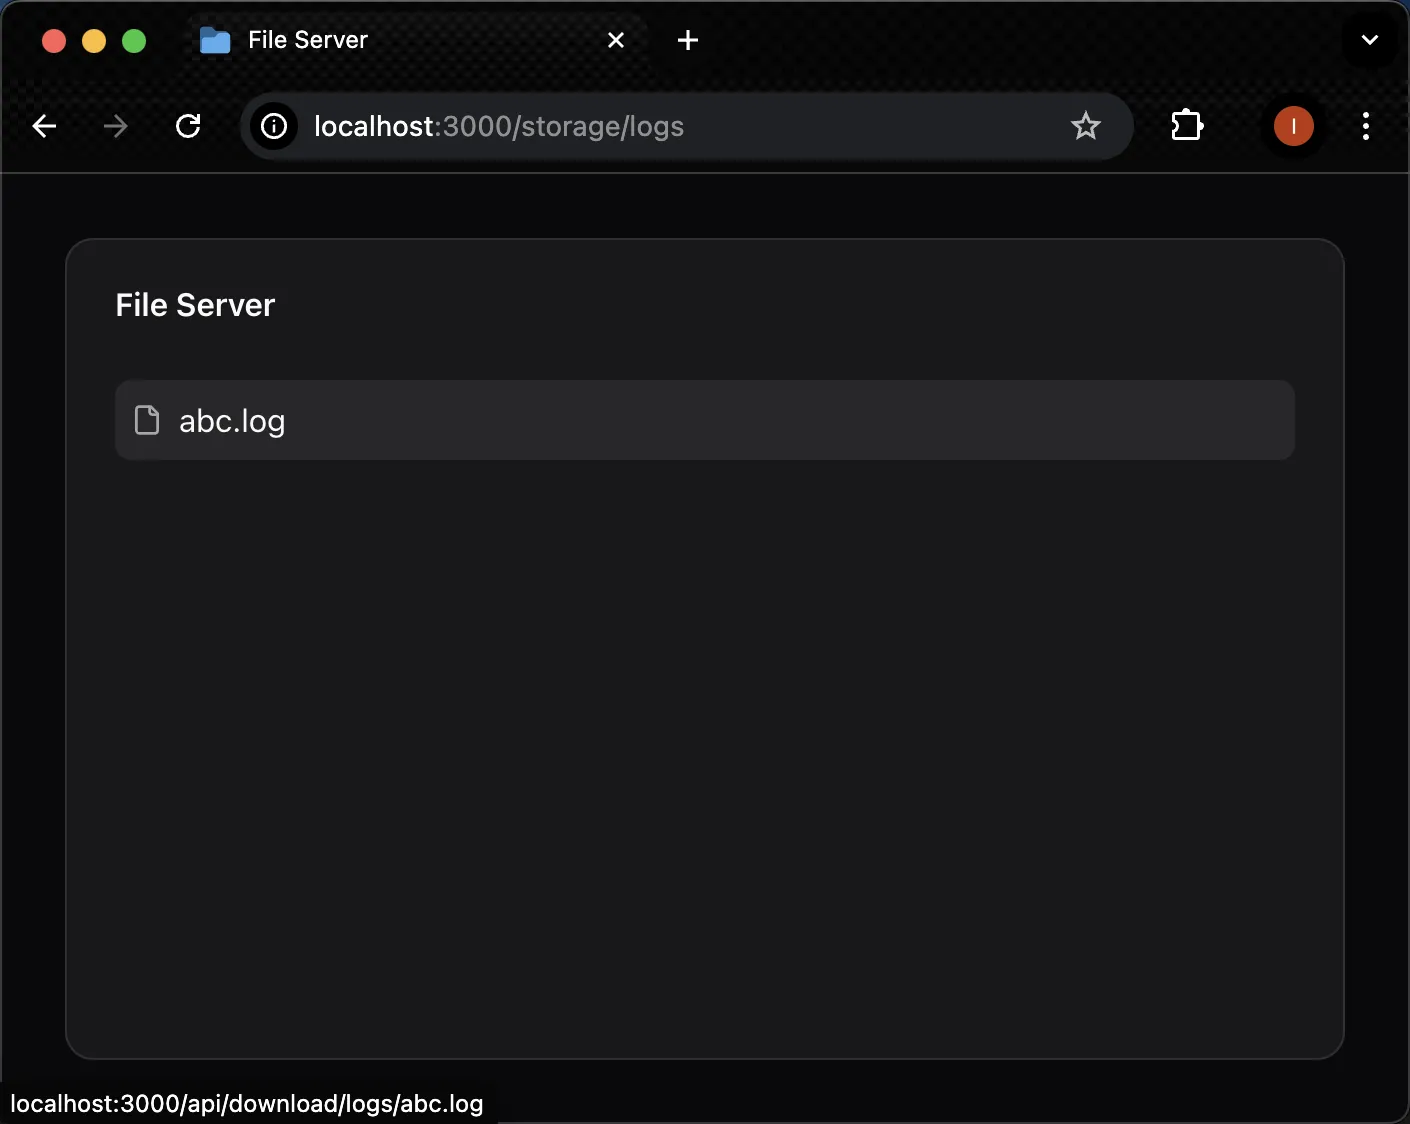
Clicking the abc.log file will download the file.
Setup
- Next.js 15 (App Router)
- shadcn/ui
- pnpm
Project Structure
Other unimportant files are omitted.
file-server-nextjs/├── src/ # Primary source code│ ├── app/ # Next.js app router│ │ ├── api/│ │ │ ├── files/route.ts # GET /api/files│ │ │ └── download/[...pathSegments]/route.ts # Dynamic download endpoint│ │ ├── storage/[[...pathSegments]]/page.tsx # File browser UI│ │ ├── auth/page.tsx # Authentication page│ │ └── layout.tsx # Root layout│ ││ ├── components/│ │ ├── ui/ # Shadcn UI components│ │ ├── file-system-entry-view.tsx # File system entry view│ │ ├── api-key-input.tsx # API key input│ │ └── sign-in-form-data.ts # Auth form schema│ ││ ├── models/ # Data models│ │ ├── file-system-entry.ts # File/directory model│ │ └── sign-in-form-data.ts # Auth form schema│ ││ └── lib/ # Business logic│ ├── services/│ │ ├── list-directory.ts # Filesystem operations│ │ └── index.ts # Service exports│ ├── auth.ts # Authentication logic│ └── utils.ts # Shared utilities│├── middleware.ts # Edge middleware├── Dockerfile # Production build├── .dockerignore├── docker-compose.example.yml # Example config├── docker-compose.yml # Local dev config├── .env.example # Env template├── .env.local # Local development├── .env.production # Production env├── next.config.ts # Next.js config└── package.jsonFile Server API
List Files & Directories
First, we define the structure for file/directory entries using Zod:
import { z } from "zod";
export const FileSystemEntrySchema = z.object({  name: z.string(),  path: z.string(),  isDirectory: z.boolean(),});
export type FileSystemEntry = z.infer<typeof FileSystemEntrySchema>;
This schema ensures each entry contains:
name: File/directory namepath: Relative path from rootisDirectory: Boolean flag for type checking
The business logic is encapsulated in a reusable service.
We will use it both in the API route and the server component src/app/storage/[[...pathSegments]]/page.tsx.
import type { FileSystemEntry } from "@/models/file-system-entry";import fs from "fs";import path from "path";
export async function listDirectory(relativeDirectoryPath: string) {  // Construct an absolute directory path  const directoryPath = path.join(    process.env.FILE_STORAGE_ROOT_DIR!,    relativeDirectoryPath,  );
  // Names of the files and directories  const names = fs.readdirSync(directoryPath);
  const fileSystemEntries: FileSystemEntry[] = names.map((name) => {    const stats = fs.statSync(path.join(directoryPath, name));    return {      name,      path: path.join(relativeDirectoryPath, name),      isDirectory: stats.isDirectory(),    };  });
  return fileSystemEntries;}
The following is the implmentation fo the API route.
It is a GET request that takes a path query parameter and returns a list of FileSystemEntry.
In Next.js, we can get the query parameter from the request object like this: request?.nextUrl?.searchParams.get("key").
import { NextRequest, NextResponse } from "next/server";import { listDirectory } from "@/lib/services/list-directory";
export async function GET(request: NextRequest) {  // Get the path from the query parameters  const relativeDirectoryPath =    request?.nextUrl?.searchParams.get("path") || "";
  // Get the file system entries  const fileSystemEntries = await listDirectory(relativeDirectoryPath);
  return NextResponse.json(fileSystemEntries);}
Download a File
The simplest way to stream files in Next.js is using Node.js’s native readableWebStream() method (official documentation).
import { NextRequest, NextResponse } from "next/server";import fs from "fs";import path from "path";
export async function GET(  request: NextRequest,  {    params,  }: {    params: Promise<{      pathSegments: string[];    }>;  },) {  const { pathSegments } = await params;
  // Get file path  const filePath = path.join(    process.env.FILE_STORAGE_ROOT_DIR!,    ...pathSegments,  );
  // Open the file  const fileHandle = await fs.promises.open(filePath);
  // Create a readable stream that can be passed to NextResponse  const stream = fileHandle.readableWebStream({    type: "bytes",  }) as ReadableStream<Uint8Array>;
  return new NextResponse(stream);}
This API uses catch-all route ([...pathSegments]) to support nested directories.
You can get the path segments by defining the params in the function signature.
One more thing to note is that although we didn’t use the parameter request here,
we still need to define it in the function signature!
Otherwise, the route handler will not be recognized by Next.js.
Althernative approaches of streaming files are available in the following awesome blog post: How to stream files from Next.js Route Handlers.
Build the UI for Browsing and Downloading Files
A component for displaying both files and directories with appropriate icons and interactions:
import type { FileSystemEntry } from "@/models/file-system-entry";import { FileIcon, FolderIcon } from "lucide-react";
interface FileSystemEntryViewProps extends FileSystemEntry {}
export function FileSystemEntryView({  name,  path,  isDirectory,}: FileSystemEntryViewProps) {  const href = isDirectory ? `/storage/${path}` : `/api/download/${path}`;  const download = isDirectory ? undefined : name;  const Icon = isDirectory ? FolderIcon : FileIcon;
return ( <a href={href} download={download} className="hover:bg-muted flex flex-row items-center justify-between gap-2 rounded-md p-2" > <div className="flex flex-row items-center gap-2"> <Icon size={16} className="opacity-60" /> <span className="line-clamp-1">{name}</span> </div> </a> );}- If it is a directory, it will link to the
storagepage (implemented below) with the path segments added. - If it is a file, it will link to the download API route.
Note that I used an anchor tag <a> here instrad of Next.js’s Link component.
This is because the Link component does not trigger the download of the file somehow 🤔.
Instead, it will display the file content in a browser tab.
The main storage page uses Next.js’s catch-all route to handle nested directory paths:
The main page is grouped under storage (for the ease of middleware matcher later) with dynamic catch-all route [[...pathSegments]].
We will intentionally exclude a dedicated home page (/) to simplify our middleware’s route matching logic.
By redirecting the root path directly to /storage, we maintain a single common entry point
for all file storage routes, which should be authenticated.
To do this, in next.config.ts, we can set the redirects option:
import type { NextConfig } from "next";
const nextConfig: NextConfig = {  /* config options here */  redirects: async () => {    return [      {        source: "/",        destination: "/storage",        permanent: false,      },    ];  },};
export default nextConfig;
File storage page:
import { Card, CardContent, CardHeader, CardTitle } from "@/components/ui/card";import { FileSystemEntryView } from "@/components/file-system-entry-view";import { listDirectory } from "@/lib/services";
export default async function Page({  params,}: {  params: Promise<{ pathSegments?: string[] }>;}) {  const pathSegments = (await params).pathSegments ?? [];  const directoryPath = pathSegments.join("/");  const fileSystemEntries = await listDirectory(directoryPath);
  return (    <div className="flex h-full flex-col items-center justify-center p-8">      <Card className="flex h-full max-h-[40rem] w-full max-w-[40rem] flex-col">        <CardHeader>          <CardTitle>File Server</CardTitle>        </CardHeader>
        <CardContent className="flex h-full flex-col overflow-y-auto">          {fileSystemEntries.map((fileSystemEntry, index) => (            <FileSystemEntryView key={index} {...fileSystemEntry} />          ))}        </CardContent>      </Card>    </div>  );}
It is a server component that:
- Uses
[[...pathSegments]]to handle both root and nested paths - Empty path fallback for root directory
- Renders the file system entries using the
FileSystemEntryViewcomponent with the data obtained from thelistDirectoryservice
Add API Key Authentication
I want to achieve the following:
- API Protection
- All API endpoints (
/api/files,/api/download) require:Authorization: Bearer <API_KEY>
- UI Protection
- Middleware redirects unauthenticated users to
/auth - Valid JWT in cookies grants access for a certain period of time, say 8 hours
JWT
We use JWTs in this project to maintain user sessions without requiring repeated API key entry. When users first authenticate with their API key, we generate a time-limited JWT and store it in a cookie. This approach provides the following benefits:
- users stay logged in across page visits,
- the server can validate sessions without storing sensitive API keys.
The package I chose to handle the JWT generation and decryption is jose instead of jsonwebtoken since the former also works in the Edge runtime.
import * as jose from "jose";
export async function createAuthToken() {  // Encode the JWT secret  const secret = new TextEncoder().encode(process.env.JWT_SECRET!);
  // Create a JWT token  const authToken = await new jose.EncryptJWT({    authorized: true,  })    .setProtectedHeader({ alg: "dir", enc: "A256GCM" })    .setIssuedAt()    .setExpirationTime(process.env.JWT_EXPIRATION_TIME!)    .encrypt(secret);
  return authToken;}
export async function decryptAuthToken(authToken: string) {  // Encode the JWT secret  const secret = new TextEncoder().encode(process.env.JWT_SECRET!);
  // Decrypt the auth token  const { payload } = await jose.jwtDecrypt(authToken, secret, {    contentEncryptionAlgorithms: ["A256GCM"],    keyManagementAlgorithms: ["dir"],  });
  return payload;}
Note that, in the above implementation, we are actually generating a encrypted JWT.
If the payload does not contain any sensitive information, we can use a plain JWT instead by using jose.SignJWT and jose.jwtVerify.
(In this case, the JWT can be decoded by everyone. It is ok for this project since the payload is just a simple object {authorized: true}.)
Auth API
The logic of the auth API is straightforward.
- Verify the API key
- Generate a JWT and store it in the cookie
In Next.js we can use the funciton cookies from next/headers to get and set cookies.
import { NextRequest, NextResponse } from "next/server";import { SignInFormDataSchema } from "@/models/sign-in-form-data";import { cookies } from "next/headers";import { createAuthToken } from "@/lib/auth";
export async function POST(request: NextRequest) {  // Parse the request data  const signInFormData = SignInFormDataSchema.parse(await request.json());
  // Get the API key  const apiKey = signInFormData.apiKey;
  if (apiKey !== process.env.API_KEY!) {    return NextResponse.json({ error: "invalid API key" }, { status: 400 });  }
  // Create a JWT token  const authToken = await createAuthToken();
  // Put the token into the cookie  const cookieStore = await cookies();  cookieStore.set("auth-token", authToken);
  return NextResponse.json({    authToken,  });}
Build the UI: API Key Input, Sign-In Form and Auth Page
When bulding the sign-in form, we follow the suggested steps from Shadcn’s React Hook Form:
- Define the form data schema (already done)
- Use
useFormto create theforminstance - Use
Formto wrap the<form>HTML element - Use
FormFieldto wrap the form field UI (e.g., input, textarea, radio group, etc.)
The schema of the form data is simple, which is just an API key:
import { z } from "zod";
export const SignInFormDataSchema = z.object({  apiKey: z.string().min(1),});
export type SignInFormData = z.infer<typeof SignInFormDataSchema>;
Next, we create an API key input component in the following. It is modified from another awesome UI library Origin UI, which is built based on shadcn/ui.
"use client";
import { useState } from "react";
import { Input } from "@/components/ui/input";import { EyeIcon, EyeOffIcon, KeyRoundIcon } from "lucide-react";import { cn } from "@/lib/utils";
export function ApiKeyInput(props: React.ComponentProps<"input">) {  const [isVisible, setIsVisible] = useState<boolean>(false);
  const toggleVisibility = () => setIsVisible((prevState) => !prevState);
  const { className, ...restInputProps } = props;
  return (    <div className="relative">      <Input        className={cn("ps-9 pe-9", className)}        placeholder="API Key"        type={isVisible ? "text" : "password"}        {...restInputProps}      />
      <div className="text-muted-foreground/80 pointer-events-none absolute inset-y-0 start-0 flex items-center justify-center ps-3 peer-disabled:opacity-50">        <KeyRoundIcon size={16} />      </div>
      <button        className="text-muted-foreground/80 hover:text-foreground focus-visible:border-ring focus-visible:ring-ring/50 absolute inset-y-0 end-0 flex h-full w-9 items-center justify-center rounded-e-md transition-[color,box-shadow] outline-none focus:z-10 focus-visible:ring-[3px] disabled:pointer-events-none disabled:cursor-not-allowed disabled:opacity-50"        type="button"        onClick={toggleVisibility}        aria-label={isVisible ? "Hide API key" : "Show API key"}        aria-pressed={isVisible}        aria-controls="apiKey"      >        {isVisible ? (          <EyeOffIcon size={16} aria-hidden="true" />        ) : (          <EyeIcon size={16} aria-hidden="true" />        )}      </button>    </div>  );}
Finally, the sign-in form:
"use client";
import {  type SignInFormData,  SignInFormDataSchema,} from "@/models/sign-in-form-data";
import { LockIcon, LockOpenIcon } from "lucide-react";import { Card, CardContent } from "@/components/ui/card";import { Form, FormControl, FormField, FormItem } from "@/components/ui/form";import { ApiKeyInput } from "@/components/api-key-input";import { Button } from "@/components/ui/button";
import { useForm } from "react-hook-form";import { zodResolver } from "@hookform/resolvers/zod";import axios from "axios";import { useRouter } from "next/navigation";
export function SignInForm() {  const form = useForm<SignInFormData>({    resolver: zodResolver(SignInFormDataSchema),    defaultValues: {      apiKey: "",    },  });
  const router = useRouter();
  const submitFormData = async (formData: SignInFormData) => {    // Clear the form    form.reset();
    // Send the request    try {      // Send the request to sign in      await axios.post("/api/auth/sign-in", formData);
      // Redirect to the home page      router.push("/");    } catch (e) {      alert(e);    }  };
  return (    <Form {...form}>      <form onSubmit={form.handleSubmit(submitFormData)}>        <Card>          <CardContent className="flex flex-col items-center justify-center gap-6">            <LockIcon className="text-muted-foreground size-24" />
            <div className="flex flex-col gap-4">              <FormField                name="apiKey"                render={({ field }) => (                  <FormItem>                    <FormControl>                      <ApiKeyInput {...field} />                    </FormControl>                  </FormItem>                )}              />
              <Button type="submit">                <LockOpenIcon                  className="-ms-1 opacity-60"                  size={16}                  aria-hidden="true"                />                Unlock              </Button>            </div>          </CardContent>        </Card>      </form>    </Form>  );}
The auth page is just a simple page that contains the SignInForm component.
import { SignInForm } from "@/components/sign-in-form";
export default function Page() {  return (    <div className="flex h-full flex-col items-center justify-center">      <SignInForm />    </div>  );}
Middleware
import { NextRequest, NextResponse } from "next/server";import { cookies } from "next/headers";import { decryptAuthToken } from "@/lib/auth";
export async function middleware(request: NextRequest) {  // Get the auth header  const authHeader = request.headers.get("authorization");
  if (authHeader !== null) {    // Get the API key from the bearer token    const apiKey = authHeader.replace("Bearer ", "");
    if (apiKey === process.env.API_KEY!) {      return NextResponse.next();    } else {      return NextResponse.json({ error: "invalid API key" }, { status: 400 });    }  }
  // Get the cookies  const cookieStore = await cookies();
  // Get the auth token  const authToken = cookieStore.get("auth-token")?.value;
  if (authToken === undefined) {    return NextResponse.redirect(new URL("/auth", request.url));  }
  try {    // Decrypt the auth token    const { payload } = await decryptAuthToken(authToken);
    // We don't need to do anything with the payload though  } catch (e) {    console.error(`failed to verify the auth token: ${e}`);    return NextResponse.redirect(new URL("/auth", request.url));  }
  return NextResponse.next();}
export const config = {  matcher: ["/storage/:path*", "/api/((?!auth\\b).*)"],};
This middleware handles authentication for protected routes using two distinct methods:
The middleware activates for:
- All paths beginning with
/storage/(using the:path*wildcard to match nested paths) - All API endpoints except
/api/auth(using the regex(?!auth\\b)to exclude the auth route specifically)
The authentication process is as follows:
- API Key Verification
- The middleware first checks for an
Authorizationheader - If present, it validates the API key against your environment variable
- Valid keys proceed to the route handler
- Invalid keys receive a 400 error response
- Session Cookie Fallback
- When no API key is provided, the middleware checks for an
auth-tokencookie - Missing tokens trigger an immediate redirect to the authentication page
- Existing tokens are decrypted and validated
- Failed validation also redirects to the auth page
Flow diagram:
Request → [Has API Key?] → Yes → [Valid?] → Yes → Proceed ↓ No [Has Auth Token?] → No → Redirect to /auth ↓ Yes [Valid Token?] → No → Redirect to /auth ↓ Yes ProceedDockerize the app
To containerize this app, copy Next.js’s official Dockerfile into the project root.
No modifications are needed.
But ensure next.config.ts enables output: “standalone” for optimized deployment, alongside your existing redirect rules.
import type { NextConfig } from "next";
const nextConfig: NextConfig = {  /* config options here */  output: "standalone",  redirects: async () => {    return [      {        source: "/",        destination: "/storage",        permanent: false,      },    ];  },};
export default nextConfig;
Environment Variables
We have seen from previous code snippets,
this application requires several environment variables for authentication, security, and file storage configuration.
Below is an example .env.example file, which serves as a template for setting up your environment:
# API key for accessing the file serverAPI_KEY=
# 256-bit JWT encryption keyJWT_SECRET=
# JWT expiration timeJWT_EXPIRATION_TIME=8h
# File storage directoryFILE_STORAGE_ROOT_DIR=- For Development
- Copy
.env.exampleto.env.localand fill in test values. - Set the
JWT_EXPIRATION_TIMEto a shorter time, e.g.,1minfor the ease of development. - Remember to ignore
.env.localin.gitignore.
- For Production
- Create
.env.productionwith real credentials. - Also remember to ignore
.env.productionin.gitignore. - Fill in the missing environment variables.
- Ensure
FILE_STORAGE_ROOT_DIRexists and has proper read/write permissions.
Write a Docker Compose File
The following is the example of the docker-compose.yml file:
version: "3.8"
services:  app:    build:      context: .      dockerfile: Dockerfile      args:        - NODE_ENV=production    env_file: .env.production    ports:      - ${HOST_PORT}:3000    volumes:      # Mount host file storage directory as read-only volume      - ${HOST_FILE_STORAGE_DIR}:/app/file-storage:ro
The Docker image uses /app as its working directory (review the Dockerfile). Within this, /app/file-storage serves as the container’s storage path - this directory is automatically created during container initialization and mounts to your designated host directory without requiring manual creation.
The ro flag ensures read-only access from the container for security.
Note from the Dockerfile that the project root inside the image is /app.
The virtual file storage directory will be designe as /app/file-storage. (file-storage needs not to be created beforehand. it will be mounted to the specified directory on the host machine.)
For production, copy the docker-compose.example.yml to docker-compose.yml and
- Replace
${HOST_PORT}with your desired port (e.g.,8080). - Replace
${FILE_STORAGE_ROOT_DIR}with the path to the directory on the host machine.
Then, you may build the image and run the container on your local machine via command:
docker-compose up -dBonus: Multi-Platform Build
As I’m developing this project on my M2 Mac (which uses ARM64 architecture),
when I built my container locally, pushed to Docker Hub,
and then tried pulling and running it on my production server (which uses AMD64 architecture), I got those frustrating exec format error messages.
Of course this happened - the architectures were completely incompatible.
The solution is to build the image for both ARM64 and AMD64 architectures.
If you have never run a multi-platform build before, you need to create a builder instance first by running:
docker buildx create \ --name multi-platform \ --use \ --platform linux/amd64,linux/arm64 \ --driver docker-container--name multi-platform- Gives your builder a descriptive label (e.g., multi-platform).
- Helpful if you manage multiple builders (e.g., for different projects).
--use- Immediately sets this builder as the default for all docker buildx operations.
- Without this, you’d need to manually specify the builder each time.
--platform linux/amd64,linux/arm64- Specifies the platforms you want to build for.
--driver docker-container- Uses an isolated container runtime (instead of your local Docker daemon).
- Enables QEMU emulation, allowing your machine to build ARM images on Intel hardware (and vice versa).
After that, you can build the image for both architectures by running:
docker buildx build -t isaacfei/file-server-nextjs:0.1.0 --platform linux/amd64,linux/arm64 --push .-t isaacfei/file-server-nextjs:0.1.0- Tag flag (names your image)
- Format:
[username]/[repository]:[version] - Example breaks down to:
isaacfei= Your Docker Hub usernamefile-server-nextjs= Repository name0.1.0= Semantic version tag
--platform linux/amd64,linux/arm64- Builds two separate images in parallel:
linux/amd64: For Intel/AMD processors (most cloud servers)linux/arm64: For Apple Silicon (M1/M2) and ARM servers
- Creates a manifest list that automatically serves the correct image
- Builds two separate images in parallel:
--push- Immediately pushes both images + manifest to Docker Hub
- Without this, images only exist locally (useful for testing)
.- The build context (where your Dockerfile lives)
- Docker includes all files in this directory by default
Installation
Build from Source
- Clone the repository:
git clone https://github.com/Isaac-Fate/file-server-nextjs.git- Check out the specific tag:
git checkout v0.1.0- Set the environment variables in
.env.production:
cp .env.example .env.productionFill in the missing environment variables.
- Create
docker-compose.ymlfile:
cp docker-compose.example.yml docker-compose.ymlFill in the host port and the host file storage directory you want to use.
- Build the image and run the container:
docker-compose up -dUse the Pre-Built Docker Image from Docker Hub
The pre-built Docker image isaacfei/file-server-nextjs:0.1.0 is available on Docker Hub. To use it:
Modify the docker-compose.yml:
- Remove the build section
- Add the image specification
version: "3.8"
services:  app:    build:      context: .      dockerfile: Dockerfile      args:        - NODE_ENV=production    image: isaacfei/file-server-nextjs:0.1.0
All other configurations remain unchanged.
Set the environment variables in .env.production and run docker-compose up -d as usual.
API Reference
Authentication
Include in headers:
Authorization: Bearer <API_KEY>Endpoints
| Method | Endpoint | Description |
|---|---|---|
| GET | /api/files?path=<DIR> | List directory contents |
| GET | /api/download/<PATH> | Download a file |
List files and directories under a given subdirectory path:
GET /api/files?path=<DIRECTORY_PATH> HTTP/1.1Host: <HOST_NAME>:<HOST_PORT>Authorization: Bearer <API_KEY>Download a file:
GET /api/download/<DIRECTORY_PATH>/<FILE_NAME> HTTP/1.1Host: <HOST_NAME>:<HOST_PORT>Authorization: Bearer <API_KEY>Examples
Suppose that I am running the container on my local machine and the host name is localhost and the port is 3000.
And suppose that the tree view of my file storage root directory data is like this:
data/├── hello.txt└── logs/ └── abc.logTo download the file hello.txt, I can send the following request:
GET /api/download/hello.txt HTTP/1.1Host: localhost:3000Authorization: Bearer <API_KEY>To download the file logs/abc.log:
GET /api/download/logs/abc.log HTTP/1.1Host: localhost:3000Authorization: Bearer <API_KEY>To list files and directories under data, I can send the following request:
GET /api/files HTTP/1.1Host: localhost:3000Authorization: Bearer <API_KEY>or
GET /api/files?path=/ HTTP/1.1Host: localhost:3000Authorization: Bearer <API_KEY>To list files and directories under the subdirectory logs:
GET /api/files?path=logs HTTP/1.1Host: localhost:3000Authorization: Bearer <API_KEY>
Comments 💬